The BuddyCRM Marketing Suite lets you easily create custom signup forms that can be embedded directly onto your website, helping you capture new leads straight into your CRM. This guide will walk you through the steps to build and publish your own signup forms.
What does the signup form do?
The main objective for the signup form is to create a new lead, using the information supplied by the end user.
If the email address entered already matches a contact within your CRM, then a new lead will not be created. Instead the supplied information will be added to an activity feed note for the existing record, whether a lead or an account.
Before we get started
A core principle of the BuddyCRM signup forms is that all data captured in the form needs to go somewhere, linking into a field within your CRM for use. Therefore you get started, good practice is to consider if any of the information you need to capture requires new fields adding, and make sure that any new fields are added via Administrator. You will need to create Merge Tags for any CRM fields that will be added to your signup form.
It is also worth considering workflows for what happens after a submission is created, which is detailed in a separate article here.
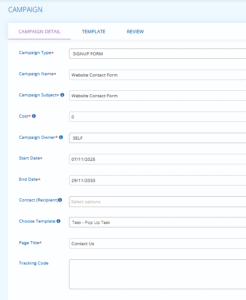
Creating the campaign
In Marketing, select ‘create campaign’ to begin the setup process.
For Campaign Type, select ‘signup form’
Campaign Name needs to be a memorable name for the form that will help you to tell it apart from others. Subject can just be a copy of Campaign Name.
Cost allows you to enter an amount if there was any business cost for creating the form.
Campaign Owner sets an ultimate owner for the campaign within the CRM and defaults to ‘self’.
Start Date and End Date determine when the form is running for in relation to tracking ROI, you could set the end date way off in the future if it won’t expire.
Contact Recipient is relevant other types of campaign, so doesn’t need setting in this context.
Choose Template allows you to select the workflow template that will trigger if the person filling in the form already exists in the CRM.
Page Title will be the title of the webpage for the signup form if the end customer goes direct to the page, this therefore needs to be a customer-friendly title (e.g Contact Us or Signup Form etc).
Tracking Code allows you to enter a Google Analytics G4A code, BuddyCRM will then output activity to Google Analytics on completion of a signup form.
Once all fields are completed, move over to the Template tab and select ‘Signup Form’ to continue to the edit window.
Overall tip: If you save changes but are not finished and need to come back later, go to Marketing > Campaign, edit the campaign but make sure to go straight to ‘Review’ then Edit. If you choose ‘Template’ again, it will discard your work so far!!!
Editing the Signup form
As with the email builder, the action buttons Edit and Save top-right start the process of editing and allow you to save changes:
![]()
The initial fields added to the signup form are the core mandatory fields.
You can edit the Title element using the gear icon to the right.
The purple gear at the top of the form allows you to set the overall background colour for the form:
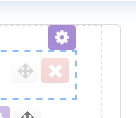
Any fields can be reordered by clicking and dragging the arrows icon to the right:

Grid: BuddyCRM utilises a 12 grid system within the signup form to help you to arrange the different elements on the page. This is a common and well-established layout method in marketing, aimed at improving compatibility with the widest range of possible email clients, browsers and devices. In essence there are different page splits, that total up to 12 grids in total.
For example utilising ’12’ will take up the full width of the page. ‘6 6’ will insert two columns that each take up half of the page.
Drag and drop in the column divider that you would like to your page, and it will create column containers to add elements into, for example in the image below highlighting a ‘6 6’:

You can rearrange columns on the page using the cross drag and drop icon, or remove using the red ‘x’. The blue icon next to the drag and drop button will duplicate the columns below.
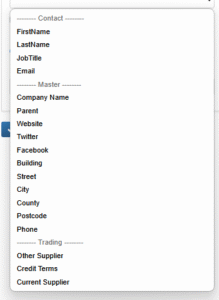
Form Elements: You can drag and drop new field types onto the form from the Form Elements window to the right.
The following types of element can be utilised:
Message: purely used to display a row of text
Text: a text box field
Numeric: a numeric box field
Check boxes: a tick box (true when ticked)
Drop down: a dropdown menu
Date: a date picker box
Textarea: a longer, expandable text field (perfect for ‘message’)
Once you have dropped a field, you can use the gear icon to the right to edit.

Field Label allows you to format the title of the field, including font, background colour, size etc.
Field Tag is where you can map the Merge Tag for the relevant field, so that when the end customer fills in this field the data maps into the correct CRM field:
Required Field makes the field mandatory on the form for the end user to complete.
Field Visibility enables you to make fields hidden so that the end user does not need to complete them. Selecting hidden then allows you to choose the default value that will be filled in when the signup form is completed:
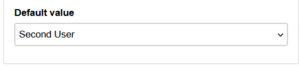
This is perfect where the option doesn’t need to be chosen by the end user, but you want to select a pre-filled value for when the entry reaches the CRM. A good example could be lead source being set to ‘website’ by default, rather than being chosen by the end user. Or account owner – the end user may not necessarily know their account owner, thus using ‘default value’ may be a good idea. Top tip: drag and reorder all ‘hidden’ fields to the bottom of your form, so that they do not clutter up the page.
The system allows you to specify Help Text to guide the end user when they hover over a tool tip.
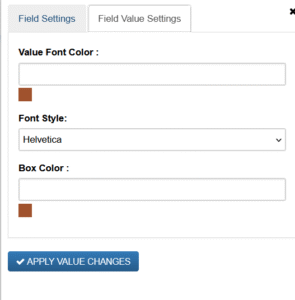
Under ‘Field Value Settings’ are further appearance based settings for the specific field you have added:
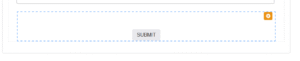
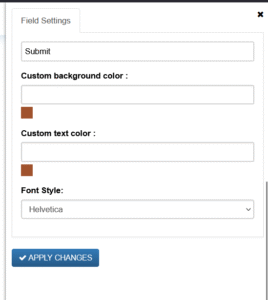
At the bottom of the signup form, the submit button element can also be edited using the gear icon to the right:
Once you have finished setting up the look and content of your form, hit the save action button top right.
Overall tip reminder!: If you save changes but are not finished and need to come back later, go to Marketing > Campaign, edit the campaign but make sure to go straight to ‘Review’ then Edit. If you choose ‘Template’ again, it will discard your work so far!!!
Publishing & embedding your form
On the Review screen, you will see the Public URL, which is the URL that your form will reside on. This will need to be given to your website designer to be embedded within an iFrame onto your website. Top tip: depending on your website design, your web developer may be best setting up the page so that when viewed on a mobile, the Public URL for the signup form is opened directly rather than embedded within an iFrame for better mobile accessibility.
The blue Publish button on the Review page publishes the form to live so that it can be publicly accessed.